

There’s something truly delightful about taking a bite of a freshly baked Gipfeli—the crisp, golden crust giving way to soft, buttery layers that melt in your mouth. If you’ve ever stepped into a Swiss bakery, you know that this crescent-shaped pastry is a breakfast favorite, often enjoyed with a warm cup of coffee, a slather of butter, or a dollop of fruit preserves. While similar to croissants, Gipfeli has a slightly firmer texture, making it just as satisfying but a bit easier to prepare at home.
This homemade Gipfeli recipe brings the experience of a cozy European café straight to your kitchen. With simple ingredients and easy-to-follow steps, even beginner bakers can achieve beautifully layered, golden pastries. The secret lies in allowing the dough to rest and keeping the butter cold between folds—this patience pays off with a light, flaky texture that’s worth every step.
One of the best things about making Gipfeli yourself is the ability to customize it to your taste. Keep it traditional and enjoy them plain, or experiment with different flavors by adding chocolate, creamy cheese, or fruit preserves. Since everything is made from scratch, you have full control over the quality and freshness of your ingredients—no artificial additives, just pure homemade goodness.
If you’re looking for a pastry that’s buttery, crisp, and full of flavor, this Gipfeli recipe is just what you need. Let’s get baking and bring the taste of Switzerland right to your kitchen!
Key Benefits of This Gipfeli Recipe
Homemade Gipfeli isn’t just a treat—it’s a rewarding baking experience that brings warm, buttery pastries to your table without the need for store-bought alternatives. Whether you’re looking for flavor, texture, or a healthier option, this recipe delivers in every way. Here’s why you’ll love making these flaky, golden pastries at home:
1. Authentic Flavor with a Homemade Touch
Nothing beats the taste of freshly baked Gipfeli—crisp on the outside, soft and slightly chewy on the inside. Unlike mass-produced versions, this homemade recipe allows you to control the quality of ingredients, ensuring a rich, buttery taste with no artificial additives.
2. Easier Than Croissants, Just as Delicious
Traditional croissants require extensive layering and chilling, but Gipfeli follows a simplified method while still delivering delicate, airy layers. If you love buttery pastries but want something less time-consuming, this is the perfect alternative.
3. Versatile & Customizable
- Prefer a sweet treat? Add chocolate, jam, or cinnamon sugar.
- Want a savory bite? Fill with cheese, herbs, or smoked salmon.
- Need a vegan option? Swap butter for plant-based margarine and use non-dairy milk.
4. Healthier Than Store-Bought Pastries
While pastries aren’t typically considered nutrient-dense, making them at home allows you to:
✔ Use whole-grain flour for extra fiber.
✔ Reduce sugar content for a lighter, less processed alternative.
✔ Opt for high-quality butter free from preservatives or hydrogenated oils.
5. Perfect for Any Occasion
Whether it’s breakfast, brunch, or an afternoon snack, Gipfeli pairs beautifully with coffee, tea, or fresh fruit. They’re great for family gatherings, holiday mornings, or simply treating yourself to a warm, comforting pastry.
6. Make-Ahead & Freezer-Friendly
- Prepare in advance and refrigerate overnight for fresh baking in the morning.
- Freeze shaped dough for up to two months—just thaw, bake, and enjoy!
With these benefits, you’ll find yourself making this Gipfeli recipe again and again. It’s an easy, rewarding bake that fills your home with the warm, buttery aroma of a European bakery—all with simple, wholesome ingredients.
Ingredients for Homemade Gipfeli
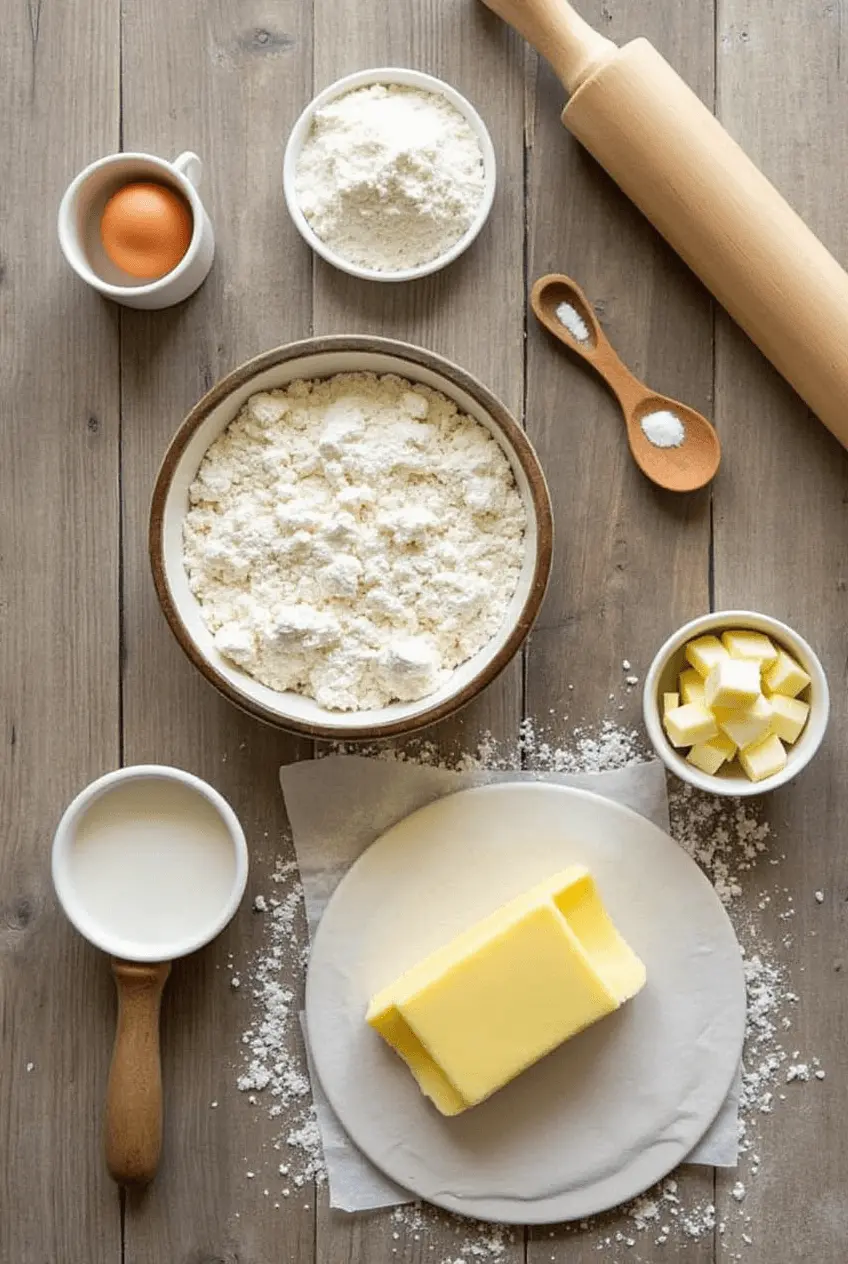
For the best flaky, buttery Gipfeli, using fresh, high-quality ingredients is key. Below is a detailed breakdown of everything you’ll need, plus a few substitutions in case you have dietary preferences.
For the Dough:
- 3 cups (375g) all-purpose flour – Provides structure. For a more rustic texture, swap with whole wheat flour (reduce by ¼ cup and add extra liquid).
- 2 ¼ tsp (7g) instant yeast – Helps the dough rise quickly. Active dry yeast works too, but activate it in warm milk first.
- ¼ cup (50g) granulated sugar – Adds a hint of sweetness. Reduce to 2 tbsp for a more savory version.
- 1 tsp salt – Enhances flavor and balances sweetness.
- 1 cup (240ml) warm milk – Creates a soft dough. Use almond, oat, or soy milk for a dairy-free alternative.
- 1 egg – Improves elasticity and richness. For an egg-free version, replace with 3 tbsp yogurt or applesauce.
- 4 tbsp (55g) unsalted butter, softened – Adds tenderness. Vegan butter works well too.
For the Butter Layer:
- ½ cup (115g) cold unsalted butter – Essential for layering. European-style butter (higher fat content) yields a richer pastry.
For the Egg Wash:
- 1 egg yolk + 1 tbsp milk – Creates a golden crust. Use plant-based milk and a dash of maple syrup for an egg-free alternative.
Each ingredient plays a role in achieving authentic, bakery-style Gipfeli—rich in flavor, golden in color, and perfectly crisp. Now, let’s start baking!
Tools & Equipment Needed
Before you start baking Gipfeli, having the right tools makes the process smoother and ensures consistent results. Here’s what you’ll need:
- Mixing Bowls – For combining and kneading the dough efficiently.
- Rolling Pin – Essential for rolling out the dough evenly and incorporating the butter layers.
- Pastry Brush – Helps in applying the egg wash for a glossy, golden crust.
- Bench Scraper – Useful for cutting dough cleanly and shaping the pastries.
- Parchment Paper – Prevents sticking and ensures even baking.
- Baking Sheet – A sturdy, flat surface for baking uniform Gipfeli.
These kitchen essentials help streamline the process and improve the quality of your homemade pastries.
Step-by-Step Instructions for Homemade Gipfeli
Creating light, buttery Gipfeli at home takes a little patience, but the reward is a golden, flaky pastry with irresistible layers. Follow these detailed steps to achieve bakery-style results every time!
Step 1: Prepare the Dough (15 Minutes + 1-2 Hours Resting)
- In a large mixing bowl, combine the flour, yeast, sugar, and salt, stirring until well blended.
- Gradually pour in the warm milk and egg, mixing until a rough dough forms.
- Transfer the dough to a lightly floured surface and knead for about 8-10 minutes, or until it becomes smooth and slightly elastic. If the dough feels sticky, sprinkle in a small amount of flour (one tablespoon at a time) to achieve the right consistency.
- Slowly incorporate the softened butter, kneading until fully absorbed into the dough. This helps create a soft and tender pastry texture.
- Place the dough in a lightly greased bowl, cover with a clean kitchen towel, and let it rise in a warm spot for 1-2 hours, or until it has doubled in size.
Step 2: Prepare the Butter Layer (10 Minutes + 15 Minutes Chilling)
- Lay a sheet of parchment paper on a clean surface and place the cold butter on top.
- Cover it with another sheet of parchment paper, then use a rolling pin to flatten the butter into a 6×6-inch (15×15 cm) square. Ensure the thickness is even for better layering.
- Transfer the butter slab to the refrigerator and chill for at least 15 minutes—it should be firm but still pliable.
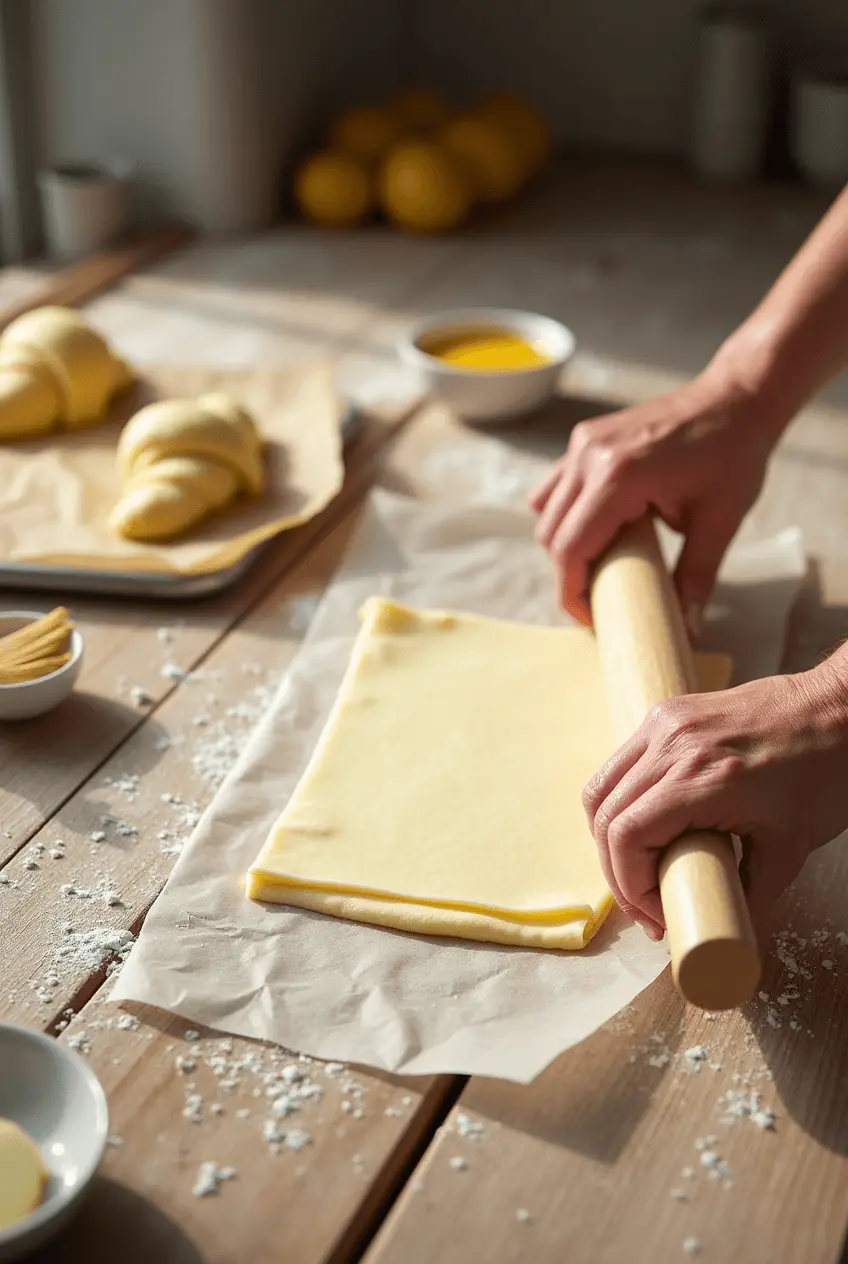
Step 3: Laminate the Dough (30 Minutes + Chilling Time)
- Roll out the risen dough on a floured surface to form a 12×12-inch (30×30 cm) square.
- Place the chilled butter square in the center, positioning it at a 45-degree angle to the dough.
- Fold the dough over the butter, completely enclosing it like an envelope. Press the edges gently to seal.
- Roll the dough into a rectangular shape, then fold it into thirds, like a letter. Wrap it in plastic wrap and chill for 30 minutes.
- Repeat this rolling and folding process two more times, always chilling for 30 minutes between each fold. This technique creates delicate, flaky layers in the final pastry.
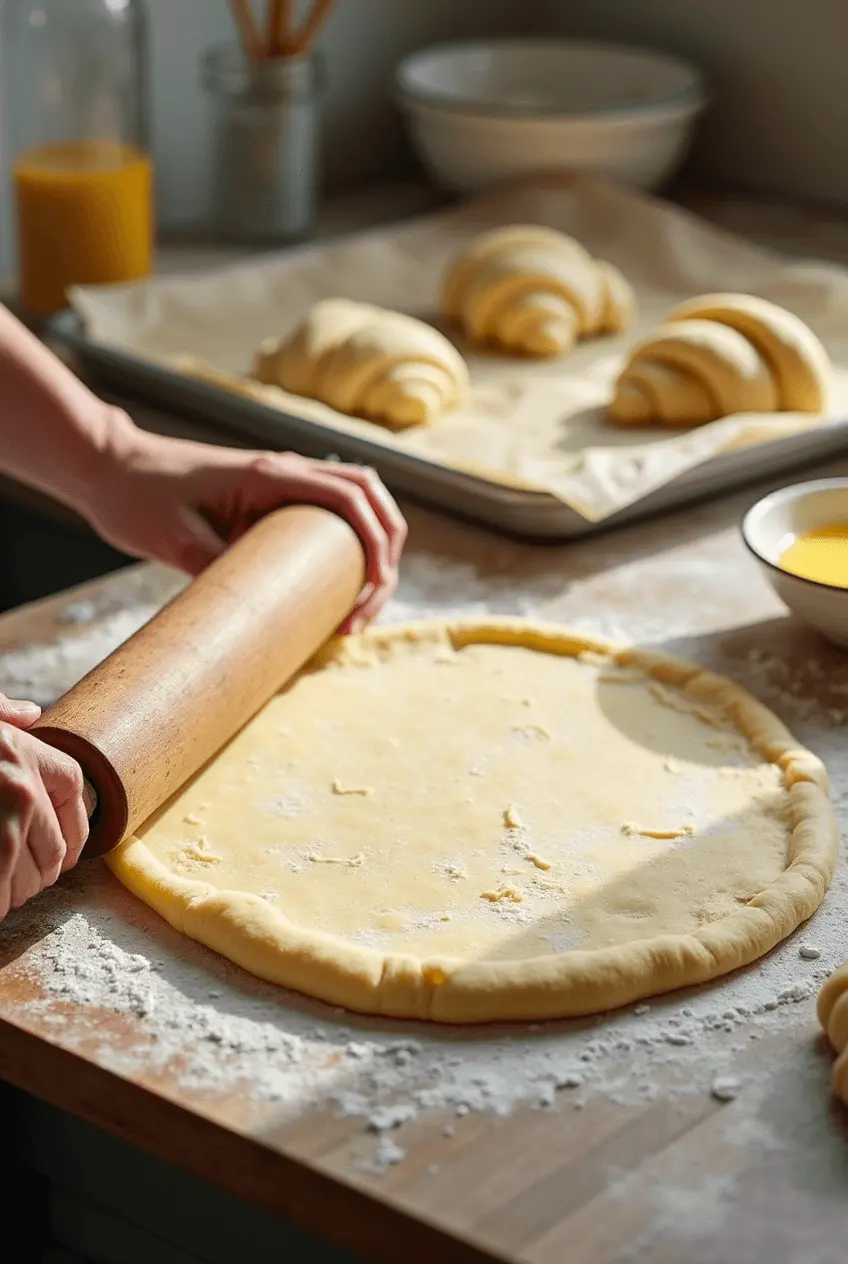
Step 4: Shape the Gipfeli (15 Minutes + 30 Minutes Proofing)
- Roll out the chilled dough into a large rectangle, about ¼-inch thick.
- Using a sharp knife or pastry cutter, divide the dough into long triangles, each with a base of about 3 inches (8 cm).
- Starting from the wide end, roll each triangle toward the tip, slightly stretching the dough as you roll to create a classic crescent shape.
- Arrange the shaped Gipfeli on a parchment-lined baking sheet, ensuring enough space between each piece for proper expansion.
- Cover loosely and let the pastries proof for 30 minutes, allowing them to become slightly puffy before baking.
Step 5: Bake to Perfection (18-20 Minutes at 375°F/190°C)
- Preheat your oven to 375°F (190°C).
- In a small bowl, whisk together the egg yolk and milk to create an egg wash. Lightly brush this mixture over each Gipfeli to ensure a golden, glossy finish.
- Bake for 18-20 minutes, or until the pastries rise beautifully and develop a deep golden-brown color.
- Once baked, remove them from the oven and let them cool slightly on a wire rack before serving. This allows the layers to set while keeping the interior soft and fluffy.
Final Touch: Enjoy Fresh or Store for Later
- Serve warm with butter, jam, or a fresh cup of coffee.
- For storage and reheating tips, check the “How to Store & Reheat” section.
By following these steps, you’ll create authentic, flaky Gipfeli that rival any Swiss bakery. Enjoy every bite!
Common Mistakes & Troubleshooting
Even experienced bakers can run into challenges when making Gipfeli. Here are some common mistakes and how to fix them:
- Dough Too Tough?
- Over-kneading can make the dough too elastic. Stop kneading once the dough is smooth and pliable.
- Butter Melts Too Quickly?
- Always chill between folds and work quickly to prevent the butter from softening into the dough.
- Not Flaky Enough?
- The oven temperature may be too low. Ensure the oven is fully preheated to 375°F (190°C) for proper rising and crisping.
- Gipfeli Too Dense?
- The dough may not have proofed long enough. Let it rise until doubled in size for a lighter texture.
Pro Tips and Variations for the Perfect Gipfeli
Making homemade Gipfeli is a blend of skill, ingredient quality, and a touch of creativity. These expert tips and fun variations will help you achieve light, flaky layers and explore new flavors for a personalized touch.
Tips for Perfectly Flaky Layers
✔ Keep Ingredients Cold – For well-defined layers, use chilled butter and cold dough. If your kitchen is warm, refrigerate your rolling pin and lightly flour your hands before handling the dough.
✔ Rest Between Folds – Laminating the dough requires patience! Refrigerating between each fold prevents the butter from melting into the dough, which helps maintain distinct, airy layers.
✔ Knead Just Enough – Work the dough until it becomes smooth and pliable, but avoid excessive kneading, as this can make the final pastry dense rather than light and tender.
Sweet Variations
- Chocolate-Filled – Add a small piece of dark or milk chocolate at the wide end of each triangle before rolling for a melty, indulgent center.
- Cinnamon Sugar Twist – Sprinkle a mix of cinnamon and brown sugar over the dough before shaping for a warm, spiced flavor.
- Nut-Infused – Fold finely ground hazelnuts or almonds into the dough to add a hint of nuttiness to every bite.
Savory Twists
- Cheese-Stuffed – Add a thin slice of cheddar, gouda, or feta before rolling for a rich, creamy center.
- Herb Butter Infusion – Brush the dough with garlic butter and dried herbs (such as rosemary or oregano) before shaping for a flavorful boost.
- Ricotta & Greens – Spoon a small amount of ricotta cheese and sautéed leafy greens (like kale or Swiss chard) onto the dough for a savory, nutrient-rich variation.
Dairy-Free & Vegan Alternatives
- Butter Substitute – Use plant-based butter with at least 80% fat content to ensure proper layering.
- Milk Replacement – Swap out dairy milk for oat, almond, or soy milk while maintaining a soft and fluffy texture.
- Egg-Free Glaze – Mix plant-based milk with maple syrup for a natural, golden finish without eggs.
Baking Adjustments for Different Textures
- Extra Crispy Layers? Start baking at 400°F (200°C) for 5 minutes, then lower to 375°F (190°C) for even cooking.
- Softer Bites? Bake at 350°F (175°C) for 22-25 minutes to retain moisture while still achieving a delicate golden crust.
With these expert tips and creative twists, you can make Gipfeli that perfectly match your taste. Whether you prefer them classic, sweet, or savory, there’s always a way to personalize these buttery pastries to make them your own!
How to Store and Reheat Gipfeli
Freshly baked Gipfeli are best enjoyed warm, but if you have leftovers, proper storage and reheating will help maintain their deliciously flaky texture. Here’s how to keep them fresh and reheat them perfectly.
Storing Gipfeli
At Room Temperature (Best for 1-2 Days)
- Let the Gipfeli cool completely before storing to prevent condensation, which can make them soggy.
- Place them in an airtight container or wrap them in parchment paper, then store in a cool, dry place.
- Refresh them in the oven at 300°F (150°C) for 5 minutes before serving.
In the Refrigerator (Good for Up to 5 Days)
- Store in an airtight container or zip-lock bag to keep them from drying out.
- Avoid stacking them too tightly to prevent crushing the delicate layers.
In the Freezer (Best for Up to 2 Months)
- Wrap each Gipfeli individually in plastic wrap, then place them in a freezer-safe bag.
- To reheat, no need to thaw—just bake directly from frozen (see below).
How to Reheat Gipfeli
Oven (Best Method for Crispness)
- Preheat to 300°F (150°C).
- Place Gipfeli on a baking sheet and warm for 5-7 minutes (10 minutes if frozen).
- This method restores the crispy, flaky texture without drying them out.
Air Fryer (Quick & Effective)
- Heat at 320°F (160°C) for 3-5 minutes for a lightly crisped exterior.
- Ideal for reheating one or two pieces at a time.
Microwave (Not Recommended but Possible)
- Heat for 15-20 seconds on a low power setting.
- Wrap in a damp paper towel to keep them from drying out.
- Expect a softer, less flaky texture compared to oven reheating.
Storage & Reheating Safety Tips
✔ Never reheat Gipfeli multiple times—this can dry them out and affect their texture.
✔ If filling contains cheese or dairy, consume within 2 days for best flavor.
✔ If reheating from frozen, avoid microwaving, as it may turn them rubbery.
By following these simple storage and reheating tips, you can enjoy buttery, flaky Gipfeli anytime—freshly baked or perfectly warmed!
Substitutions for the Perfect Gipfeli
Whether you’re working around dietary restrictions, ingredient availability, or simply looking for a twist on the classic Gipfeli recipe, these smart swaps will help you customize the pastries without compromising their flaky, buttery texture.
Dairy-Free Alternatives
- Butter → Plant-Based Butter (80% Fat Content)
- Choose a high-fat vegan butter for proper lamination. Margarine works, but it may result in a softer texture.
- Milk → Almond, Oat, or Soy Milk
- These options keep the dough soft and tender while maintaining a neutral flavor.
Flour Substitutions
- All-Purpose Flour → Bread Flour
- Gives a chewier texture due to higher protein content.
- All-Purpose Flour → Whole Wheat Flour (Reduce by ¼ Cup)
- Adds fiber and a nuttier taste but may make the dough slightly denser.
Egg Replacements
- Egg in Dough → 3 tbsp Yogurt or Unsweetened Applesauce
- Helps with moisture and binding without affecting texture.
- Egg Wash → Maple Syrup + Plant-Based Milk
- Creates a golden, slightly glossy finish without eggs.
Sweet & Savory Variations
- Sugar → Honey or Maple Syrup (Reduce Liquid Slightly)
- Adds a natural sweetness with mild caramel notes.
- Savory Fillings → Cheese, Spinach, or Herbs
- Try feta, ricotta, or sautéed greens for a delicious savory version.
With these easy swaps, you can make Gipfeli that fit your needs while still being buttery, light, and delicious!
Serving Suggestions for Perfect Gipfeli
Freshly baked Gipfeli are a joy on their own, but pairing them with the right sides can elevate the experience—whether you’re serving them for breakfast, brunch, or a cozy snack. Here are some delicious ways to enjoy your flaky pastries:
Classic Breakfast Pairings
- Coffee or Tea: The buttery, crisp layers of Gipfeli are best enjoyed with a hot cup of coffee, black tea, or herbal infusion. A touch of honey in your tea enhances the pastry’s delicate sweetness.
- Fruit Preserves & Butter: Serve with apricot jam, raspberry preserves, or a light spread of honey for a touch of natural sweetness.
Savory Options
- Cheese & Fresh Vegetables: Pair with mild cheeses like brie or gouda, alongside crisp cucumber slices or cherry tomatoes for a balanced bite.
- Soft Scrambled Eggs: A plate of creamy, lightly seasoned scrambled eggs adds protein and a comforting contrast to the flaky pastry.
Light & Refreshing Sides
- Fresh Fruit Bowl: A mix of strawberries, blueberries, and citrus slices creates a vibrant, refreshing contrast to the richness of the Gipfeli.
- Simple Green Salad: For a balanced brunch, serve with a light salad tossed in a lemony vinaigrette. The crisp greens add a refreshing contrast to the buttery pastry.
Presentation Tips
- For a bakery-style feel, serve your Gipfeli on a wooden board or elegant platter, dusted with a light sprinkle of powdered sugar.
- Add color contrast with bright fruits or microgreens for a more Instagram-worthy plating.
How do you love serving your homemade Gipfeli? Share your ideas and plating photos!
Cultural & Regional Trivia
The Swiss Love for Gipfeli
Did you know that Gipfeli is Switzerland’s version of the French croissant? While they share similar origins, Swiss Gipfeli is often less flaky and slightly denser in texture, making it unique from its French counterpart.
Traditional Serving in Switzerland
- Breakfast: Enjoyed plain or with butter and jam, often alongside a cup of coffee or hot chocolate.
- Savory Variations: Some Swiss bakeries fill them with cheese, ham alternatives, or fresh herbs.
- Festive Treat: In some regions, Gipfeli is served at Sunday brunches or as a special treat during holiday gatherings.
Learning about its cultural significance makes the baking experience even more authentic and enjoyable!
Conclusion
Making homemade Gipfeli is a truly rewarding experience—one that fills your kitchen with the comforting aroma of buttery, golden pastries while giving you complete control over flavor, ingredients, and freshness. With just a little patience and the right technique, you can achieve flaky, bakery-style layers right at home.
Quick Recap:
✔ Light, crisp, and buttery texture with a soft inside
✔ Customizable—enjoy them plain, sweet, or savory
✔ Easy storage & reheating for fresh Gipfeli anytime
✔ Simple ingredient swaps for dairy-free or whole-grain options
Now, it’s your turn! Try this Gipfeli recipe, enjoy the flaky goodness, and make it your own with fun variations. If you give it a go, share your experience in the comments or post a picture on social media—nothing beats fresh, homemade pastries made with love!

Gipfeli Recipe
Ingredients
For the Dough:
- 3 cups 375g all-purpose flour – Provides structure. For a more rustic texture, swap with whole wheat flour (reduce by ¼ cup and add extra liquid).
- 2 ¼ tsp 7g instant yeast – Helps the dough rise quickly. Active dry yeast works too, but activate it in warm milk first.
- ¼ cup 50g granulated sugar – Adds a hint of sweetness. Reduce to 2 tbsp for a more savory version.
- 1 tsp salt – Enhances flavor and balances sweetness.
- 1 cup 240ml warm milk – Creates a soft dough. Use almond, oat, or soy milk for a dairy-free alternative.
- 1 egg – Improves elasticity and richness. For an egg-free version replace with 3 tbsp yogurt or applesauce.
- 4 tbsp 55g unsalted butter, softened – Adds tenderness. Vegan butter works well too.
For the Butter Layer:
- ½ cup 115g cold unsalted butter – Essential for layering. European-style butter (higher fat content) yields a richer pastry.
For the Egg Wash:
- 1 egg yolk + 1 tbsp milk – Creates a golden crust. Use plant-based milk and a dash of maple syrup for an egg-free alternative.
- Each ingredient plays a role in achieving authentic bakery-style Gipfeli—rich in flavor, golden in color, and perfectly crisp. Now, let’s start baking!
Instructions
Step 1: Prepare the Dough (15 Minutes + 1-2 Hours Resting)
- In a large mixing bowl, combine the flour, yeast, sugar, and salt, stirring until well blended.
- Gradually pour in the warm milk and egg, mixing until a rough dough forms.
- Transfer the dough to a lightly floured surface and knead for about 8-10 minutes, or until it becomes smooth and slightly elastic. If the dough feels sticky, sprinkle in a small amount of flour (one tablespoon at a time) to achieve the right consistency.
- Slowly incorporate the softened butter, kneading until fully absorbed into the dough. This helps create a soft and tender pastry texture.
- Place the dough in a lightly greased bowl, cover with a clean kitchen towel, and let it rise in a warm spot for 1-2 hours, or until it has doubled in size.
Step 2: Prepare the Butter Layer (10 Minutes + 15 Minutes Chilling)
- Lay a sheet of parchment paper on a clean surface and place the cold butter on top.
- Cover it with another sheet of parchment paper, then use a rolling pin to flatten the butter into a 6×6-inch (15×15 cm) square. Ensure the thickness is even for better layering.
- Transfer the butter slab to the refrigerator and chill for at least 15 minutes—it should be firm but still pliable.
Step 3: Laminate the Dough (30 Minutes + Chilling Time)
- Roll out the risen dough on a floured surface to form a 12×12-inch (30×30 cm) square.
- Place the chilled butter square in the center, positioning it at a 45-degree angle to the dough.
- Fold the dough over the butter, completely enclosing it like an envelope. Press the edges gently to seal.
- Roll the dough into a rectangular shape, then fold it into thirds, like a letter. Wrap it in plastic wrap and chill for 30 minutes.
- Repeat this rolling and folding process two more times, always chilling for 30 minutes between each fold. This technique creates delicate, flaky layers in the final pastry.
Step 4: Shape the Gipfeli (15 Minutes + 30 Minutes Proofing)
- Roll out the chilled dough into a large rectangle, about ¼-inch thick.
- Using a sharp knife or pastry cutter, divide the dough into long triangles, each with a base of about 3 inches (8 cm).
- Starting from the wide end, roll each triangle toward the tip, slightly stretching the dough as you roll to create a classic crescent shape.
- Arrange the shaped Gipfeli on a parchment-lined baking sheet, ensuring enough space between each piece for proper expansion.
- Cover loosely and let the pastries proof for 30 minutes, allowing them to become slightly puffy before baking.
Step 5: Bake to Perfection (18-20 Minutes at 375°F/190°C)
- Preheat your oven to 375°F (190°C).
- In a small bowl, whisk together the egg yolk and milk to create an egg wash. Lightly brush this mixture over each Gipfeli to ensure a golden, glossy finish.
- Bake for 18-20 minutes, or until the pastries rise beautifully and develop a deep golden-brown color.
- Once baked, remove them from the oven and let them cool slightly on a wire rack before serving. This allows the layers to set while keeping the interior soft and fluffy.
Final Touch: Enjoy Fresh or Store for Later
- Serve warm with butter, jam, or a fresh cup of coffee.
- For storage and reheating tips, check the “How to Store & Reheat” section.
- By following these steps, you’ll create authentic, flaky Gipfeli that rival any Swiss bakery. Enjoy every bite!
Notes
| Nutrient | Amount | Notes |
| Calories | 220 kcal | Based on standard butter and flour composition |
| Total Fat | 10g | Primarily from butter; can be reduced with dairy-free alternatives |
| Saturated Fat | 6g | Higher in traditional butter but can be adjusted with plant-based options |
| Cholesterol | 40mg | Comes from butter and eggs |
| Carbohydrates | 28g | Mostly from all-purpose flour |
| Sugars | 4g | Can be reduced by adjusting sugar content |
| Fiber | 1g | Whole wheat flour substitution can increase fiber |
| Protein | 4g | Enhances with added seeds, nuts, or whole grains |
| Sodium | 150mg | Lower sodium options available by adjusting salt |
FAQs: Everything You Need to Know About Homemade Gipfeli
Q1: What’s the difference between Gipfeli and croissants?
Both Gipfeli and croissants are buttery, layered pastries, but Gipfeli has a slightly denser texture and requires fewer folds during lamination. Unlike croissants, Gipfeli often has a mildly sweet or savory taste without excessive flakiness.
Q2: Can I make Gipfeli without yeast?
Yes, but the texture will change. Yeast helps create a light, airy pastry, while a non-yeasted dough (using baking powder instead) will be denser and more biscuit-like. If you prefer a quick version, try puff pastry dough as a substitute.
Q3: Can I prepare Gipfeli dough the night before?
Absolutely! Refrigerate the shaped Gipfeli overnight (before baking) to develop flavor and save time in the morning. Simply let them sit at room temperature for 15-20 minutes before baking to ensure even rising.
Q4: How long can I store baked Gipfeli?
Room Temperature: Best eaten within 1-2 days when stored in an airtight container.
Refrigerator: Keeps fresh for up to 5 days—just reheat before serving.
Freezer: Store for up to 2 months in a sealed bag, then bake from frozen or thaw before reheating.
Q5: What’s the best way to reheat Gipfeli?
Oven (Best Method): 300°F (150°C) for 5-7 minutes for a crispy texture.
Air Fryer: 320°F (160°C) for 3-5 minutes—quick and effective!
Microwave (Not Recommended): Can make them soft and chewy, but use 15-second bursts if needed.
Q6: Can I make a dairy-free version of Gipfeli?
Yes! Use plant-based butter (at least 80% fat) for layering and almond, oat, or soy milk in the dough. For an egg wash alternative, brush with a mix of maple syrup and non-dairy milk for a golden finish.
Q7: Can I add fillings to Gipfeli?
Definitely! For sweet versions, try chocolate, fruit preserves, or cinnamon sugar. For savory variations, add cheese, herbs, or spinach and ricotta before rolling them up.
Q8: Can I freeze the dough instead of baking right away?
Yes! After shaping the Gipfeli, place them on a tray and freeze until solid. Then transfer to an airtight bag and freeze for up to 2 months. When ready to bake, let them thaw slightly before baking as usual.
Q9: Why didn’t my Gipfeli turn out flaky?
The butter may have melted into the dough—always chill between folds.
Over-kneading can lead to a tougher texture.
The oven temperature might be too low—make sure it’s properly preheated!
Q10: How can I make mini Gipfeli?
Simply cut smaller triangles before rolling. Reduce baking time by 3-5 minutes, and check for a golden brown color to ensure they don’t overbake.
Have more questions? Drop them in the comments below, and let’s bake the best Gipfeli together!
Nutritional Information for Homemade Gipfeli
Gipfeli is a buttery, flaky delight, perfect for breakfast or a light snack. While it’s an indulgent treat, making it from scratch lets you control the ingredients and adjust the recipe to fit your dietary needs. Below is an estimated nutritional breakdown for one standard-sized Gipfeli (about 60g):
Per Serving (1 Gipfeli):
- Calories: ~220 kcal
- Carbohydrates: 28g
- Protein: 4g
- Fat: 10g
- Saturated Fat: 6g
- Fiber: 1g
- Sugar: 4g
- Sodium: 150mg
Healthier Modifications:
✔ Lighter Version: Replace half the butter with Greek yogurt for reduced fat—though this may slightly affect flakiness.
✔ Boosted Fiber: Swap half the all-purpose flour for whole wheat flour to increase fiber and essential nutrients like iron and magnesium.
✔ Dairy-Free Option: Use plant-based butter (at least 80% fat) and almond or oat milk for a non-dairy alternative without sacrificing texture.
Nutritional values can fluctuate based on portion size, ingredient brands, and modifications. For precise calculations, use a nutrition tracker based on the specific products you choose.
Enjoy your homemade Gipfeli—a perfect mix of crisp layers, buttery flavor, and endless customization possibilities!